Saturday, August 31, 2013

OHW Labor Day Weekend VCMP (Virtual Card Making Party) Challenge 2

I just made this card for Operation Write Home Labor Day Weekend Virtual Card Making Party. Challenge 2:  Create a card with elements that represent each letter of Operation Write Home. I have the Owls, sitting on Wood, Wearing Hats with White pompoms, saying Hello.  They're just Waiting to Hear, "How you doin'?" And one Owl needs to Wake up!


Kinda of weird, but it was relaxing when I cut out the tree branch. Originally, there are leaves behind the owls, but I cut them out and extended them on the end with one overlapping the end owl. I like how it turned out. Of course, I love coloring with my Copics. 


I hope you like. Thank you OWH for the great challenge.
Thanks for looking!

Materials used:
Ink: Stampin' Up pads and markers, Copics
Stamps: Darcie's (Bless your Nest), Mama Elephant (Hello), Art Impression (Whoots)


OHW Labor Day Weekend VCMP (Virtual Card Making Party)....Challenge 1 - Take Two

Okay. So my previous post I realized I did this challenge wrong. I only followed the sketch and did not do a winter or Christmas Theme. I tried to find a holly leaf or a poinsettia punch so I could just embellish the card. Nope. Adding snowflakes to the  existing card was just too busy.


Here is the sketch again. Note to self. Winter or Christmas theme


I went for the same look, but it didn't look right. I didn't have any Christmas/Winter themed paper so went with this dark green. I tried to glitterize it by using a bottle of Stickles. I wasn't happy with the outcome. So I opened one of many craft drawers and pulled out these shimmery powders that I have owned for many, many years. All it takes is a little dip and it goes a long way. I can pass these on to my great-great-great grandchildren and there will still be plenty of it. But for picture purposes I wasted some powder. I flipped the cap over for a photo moment and a lot of  powder fell from the cap. I stopped dipping from the main compartment and just took from the spillage and "cleaned" it up from there. 
In blog posts when one is showing off a glitter card they always say, "It looks better in person." Yup, the camera doesn't really capture the shimmeriness (is that a word?) of this card. 


 I still had a lot (well, to me it's a lot) of powder still left to be used. Crazy how some got on my scissors. I took my "oops" card and shimmerized (Is that a word?) the embossed portions. I like it a lot better.

Thanks for looking!

Take care.
Lynn


Supplies Used
Stamps: Stampin' Up (Petite Pairs)
Snowflake punches

OHW Labor Day Weekend VCMP (Virtual Card Making Party)....Challenge 1 - Oops!

Hello everyone! Today is a busy day for me. I am doing the laundry, cleaning my bathroom, cleaning the kitchen, making cards and then blogging about them. This weekend I'll be making cards for Operation Write Home. They are hosting a Labor Day Weekend Virtual Card Making Party where every couple of hours they post a challenge.

This is my first time participating in a blog hop challenge and first time participating with OWH. I'm very excited. Three challenges have been already posted since this morning. I better catch up.


Here is the sketch. As I refer back and forth to the actual challenge link, it appears I did this challenge halfway wrong. I was to make a winter or Christmas themed card using the sketch. Oops!


So, here is my card just based on the sketch. I am going to put a load in the laundry and then make another card. Silly me. 

Materials Used
Embossing folders: Various designs from The Paper Studio, Sizzix, Cuttlebug and Crafts-Too
Stamp: Simon Says Stamp Exclusive (Talk Bubbles 2)

Friday, August 30, 2013

Happy Everything. Retrosketches 78

Happy Friday everyone. I made this card yesterday for the Retrosketches #78 Challenge. I actually made it yesterday and just posting it today. I know... pretty exciting news, huh. I won't be making any cards today because my creative desk is a total mess. Ooh, my sister would be very mad if she saw this because she organized it while she was visiting from New York. I bought some storage containers for my stamps and Copic markers so I'm going to work on that.


This is just one corner of my craft area. There are two more tables on the left. Um, I won't be showing you that side of the creative disaster.


Here is the great sketch from retrosketches


Here is my take. Looks like a filing organizer. Sorry, I don't know who designed the "happy birthday" stamp. I have a friend who likes to come over when I have a creative get together. She doesn't scrapbook or make cards, she likes to die cut and just stamp without any purpose. So I had her make a whole bunch of these so that I can just make a card with patterned paper and whip out one of these with dimensional tape and add it to the card. So if anyone recognizes it, let me know so I can give proper credit. Thanks.


I added dimensional tape behind the little papers to give it more dimension.


My boys complain that I don't make enough manly cards. Will make another one like this with more masculine colors. So picky...sheesh... hahaha.

Thanks for looking! Hugs ~ Lynn

Materials Used:
Paper: Basic Grey (kneehighs)
Die: MFT die-namics (framed greetings)
Ink: Memento (Tuxedo black), Stampin' Up (Peach Parfait)
Stamps: Verve (Happy Phrases), Papertrey (Little Bitty Bird), Unknown "Happy birthday"

Wednesday, August 28, 2013

Thanks - Pinspired Challenge #16

My card making goal today is to make cards without any stamps. I was inspired by the current Pinspired challenge and the many tutorials on die-cutting. In the process of making these cards, I kept changing the way it turned out. Let me explain my crazy process..


So here was my wonderful inspiration. Loved the colors and how the "THANKS" is almost hidden. 


I used the dies by My Favorite Things Die-Namics, By the Letters, lowercase. I used my cutting mat to line them up and used washi tape to keep them together. 


Occasionally, the letters were stuck in the die, but I couldn't use a pin to poke them out because the washi tape was in the way. I used scrap washi tape that I have sticking all over my lamp to get them out. 


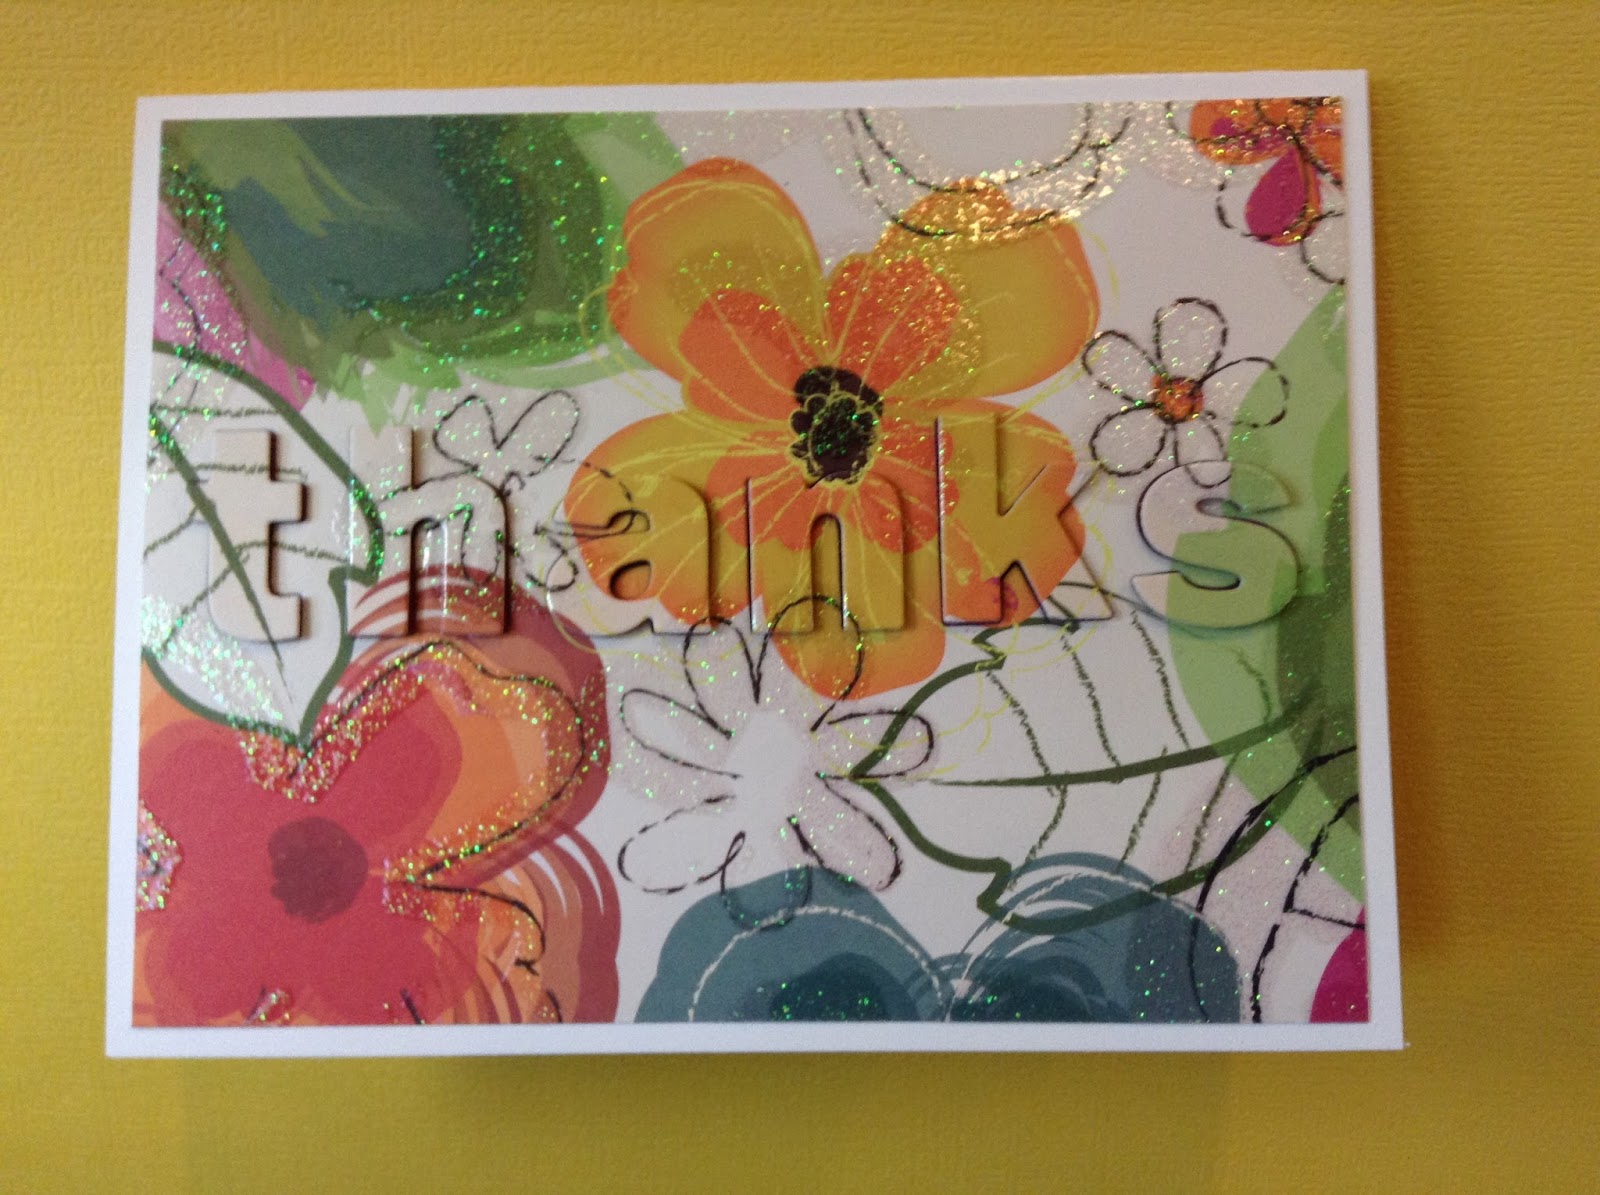
Then I put the dimensional adhesive. This was my first card. By the third card, I used a roll of foam tape and cut them into thin strips and applied them directly to the die cut letter. This was was easier. I didn't have little paper backings all over the place and adhesive sticking out beyond the letter. I also penciled in the little opening in the "a" and glued that little teeny tiny die cut in there.


So my first card, I colored in the letters with a very light copics marker (E0000) to make "thanks" pop out more. I added Glossy Accent to it. 


Second card, I thought the "thanks" needed to be darker so I used the next Copic marker (E00) but it was too dark. Also there were shiny glittery areas that wouldn't hold the Copic color, so it just looked weird.


Then I decided to add a marroon scratch paper behind the cut out and stick the die cut letters to that. It added a nice shadow effect. 


Since I used two sheets of the same patterned paper, I decided to take two identical cuts and die cut both papers at the same time. I kept one set of the die cut letters inside the bottom paper and taped it securely in the back so the letters wouldn't come out. Then I took the second set of die cut letters and placed it on top. I like this card a lot better. There are no white spaces.


So I had the negative left. The one bad thing with this card was that I lost the little section of the "a" I had to improvise. I tried to find a small enough heart or flower to fill it in. Nope. I found this corner punch and used it on scrap paper and cut a little of the point off. It's not a perfect match, but I didn't want this part of the card to go to waste. 


All my pretty cards. Thank you Pinspired Challenge for the inspiration. These challenges are a great motivation to get some creative cards done. 

Thanks for looking,
Lynn

Supplies used:
Dies: My Favorite Things (By the Letters, lowercase)
Paper: sei (Bright Blossom)

Tuesday, August 27, 2013

Many Thanks

Hello everyone,

I'm still at it. Making thank you cards for my son, Kainoa. I'm making about 2-8 cards a day, but he's only writing them out only once a day or one every 2-3 days. I would like for him to send out thank you cards for his high school graduation, not by the time he has his college graduation.

This card I made incorporated a sketch challenge and a 10 minute challenge. The 10 minute craft dash hosted by Pretty Pink Posh is a really cool challenge to but very stressful. I have to listen to classical music as it helps me slow down and not be so frantic.


So here is where I started. We are allowed to get all our supplies out before we set the timer. 


Even though I cut out two masks, I was able to finish on time. I did make a boo boo. I had two masks on my card so I had to stamp the rose colored stamp with a lot of pressure. My stamp edge had ink on it and it transferred onto my card so that really bugged me... a lot. I thought I could fix it by stamping some blue ink on the edge of a stamp and stamp next to blue leaf because I knew I couldn't find a matching marker in time. But I boo booed again because there's  a little sliver of blue on the rose colored flower. Ugh! Oh well. 


I turned the Seize the Sketch #2 counterclockwise for my card. Many thanks for Pretty Pink Posh 
and Seize the Sketch for the challenge and inspiration

Thanks for looking!
Lynn

Supplies Used
Paper: Colorbok (Beach House)
Ink: Stampin' Up (Regal Rose, Peach Parfait, Baja Breeze) Memento (Tuxedo Black)
Stamps: Hero Arts (Sweet Threads Set. Sweet Threads Labels)

Sunday, August 25, 2013

Hello - Less is More: Week 134 - Recipe Washi Tape

There are so many cute washi tape patterns out there but what impresses me the most is you can totally lift the tape off the paper and not tear the paper up. The washi tape I used in this card is from Pick Your Plum.

I was able to make two cards out of the die cuts. I used My Favorite Things' Happy Hellos Die. I used the positive and the negative. I was inspired by Less is More challenge, the recipe is to use washi tape.


I'm positive I like the card with the negative.


The positive. I didn't waste anything. 

Supplies Used
Washi tape
Die: My Favorite Things (Happy Hellos die)

Thank You - Paper Players #160 & RIC #42

This was a fun card to make because of the paint splattering technique and watercoloring the inside image.


This runway inspired challenge brought great inspiration from the colors, the paint splatters and the sharp lines. Thank you Runway Inspired Challenge for the inspiration. 


The Paper Players also gave me inspiration for the card as well.  The challenges were perfect together.

Supplies Used:
Stamps: Studio 112, Hero Arts (Large Open Flower)
Ink: Stampin' Up (Island Indigo, watercolors
Misc: Washi Tape, Die (Circles)

So Special

Still making Thank You cards for my son. I made this card for a challenge, but then I took a nap and missed the deadline to post. Oh well. It was a very simple card to make and I used scrap paper too.


Supplies Used
Dies: Simon Says Stamp (Leaf Column Background, Leaf Column Outline)
Memento Ink (Tuxedo Black
Stamps: Hero Arts (Sweet Threads)

Saturday, August 24, 2013

Hello Darling

Since being sick and still not fully recovered, I have had a lot of creative time on my hands. I am a new fan to Mama Elephant stamps. They currently have a month long challenge where you find  creative inspiration in a photo.

 A lot of fun coloring and masking (not so fun) was done. I even used five different Mama Elephant stamps. Here is my creative interpretation. I picked up the colors pink, black and yellow from the picture. I also liked how the pillows were arranged and did the same thing for my "stuffed animals." I have many different versions of this card and this one is my favorite. Do you notice the crab holding the heart pillow. I used an x-acto knife to cut his claws and then inserted the heart pillow. My Copic shadowing almost looks 3D.... whoa.


Thanks for looking. Have a creative day!
Lynn

Supplies Used
Stamps: Mama Elephant (Tree Friends, Filigree, Nursery Deco, Cosmic Stars, Up and Away)
Memento Ink
Copic Markers
Washi tape

Oh, fun!

I feel like this card. I have the moods of the owls. So tired. So blah. So bored. But my mind is racing with ideas, colors, creative restlessness and screaming out, "Oh, fun!"  I love coloring with my Copic markers. It's just so relaxing for me. I'm loving Cas-ual Friday's current color scheme. Love it. Love it. Love it!


Supplies used:
Stamps: Whipper Snapper Designs (Hooters), Hero Arts (Homey Patterns)
Ink: Mememto (Tuxedo Black)
Copic Markers